This method for backups has progressed out of my desire to create a centralized backup system for users who do not necessarily trust me and whom I (as a sysadmin) may not completely trust. This system is just as easily used between a group of peers, each backing up to each other, but requires each peer to do some systems maintenance which can be problematic in the real world.
In this part, we'll cover the client needs, software and configuration. In part 2, we'll cover the server software and configuration.
For those too impatient to read the entire document, there is a quick summary at the end.
This document is available in docbook format at http://projects.cretin.net/backup/duplicity-backups-part1.xml
The backup client wants to be able to backup a local machine over the network to a potentially untrusted server (both in terms of its sysadmins and its users).
Since the backups are over the network, communications with the backup server should be encrypted, also since network transmission is expensive it is desirable to send as little data across the wire as possible and thus incremental backups should be used. Since the backup server is untrusted, all backups should be encrypted to prevent against spying by sysadmins and users alike. Finally, backups should be able to be scripted and should be able to occur unattended.
-
backups should occur over a network
-
communications with the backup server should be encrypted
-
data should be backed up incrementally
-
backed up data should be encrypted
-
backups should be unattended
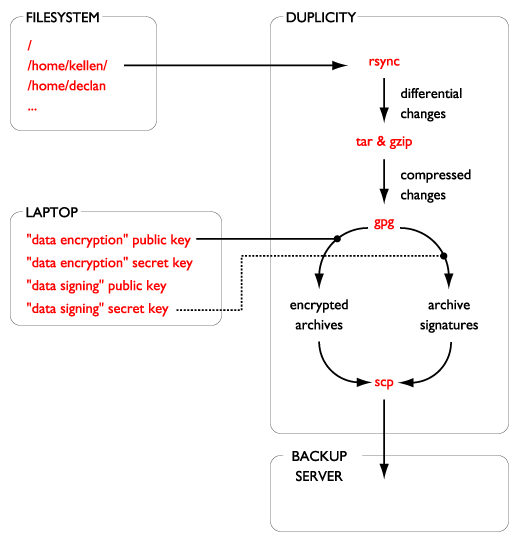
Duplicity is a backup utility which provides incremental encrypted network backups using the rsync algorithm, scp/ftp/rsync as a transfer mechanism, and support for gpg.
We'll use duplicity with gpg and scp. Duplicity natively supports four of our five requirements:
-
backups should occur over a network (via scp)
-
communications with the backup server should be encrypted (also via scp)
-
data should be backed up incrementally (via the rsync algorithm)
-
backed up data should be encrypted (via gpg)
To get duplicity, run:
~# apt-get install duplicity
The OpenSSH package (ssh) provides scp and the GNU privacy guard package (gnupg) provides gpg. These are installed by default on most Debian systems, but if you need them, run:
~# apt-get install ssh gnupg
Note
Duplicity is not under active development. The most recent version at the time of writing is 0.4.1, released August 9, 2003. The author of duplicity states that "duplicity is not stable yet," but he has turned his efforts to the similar, but unencrypted, rdiff-backup. I have personally contacted the Debian package maintainer for duplicity, who said that he and others were using it in a production environment.
One of the advantages of duplicity is that it provides for integrated encryption of backup files. We'll need two gpg keys for our backups; an "encryption key" and a "signature key." Our encryption key is used to protect the data in the backup files from snooping on the backup server, while the signature key is used to ensure the integrity of the backup files.
Duplicity's --encrypt-key option allows a user to
specify either a symmetric or public key with which to encrypt the backup
archives. Duplicity's --sign-key option specifies
either a symmetric or public key with which to sign the backup archives. If
encryption is turned on, and the --sign-key option is
omitted, the --encrypt-key key is also used to sign
the archives.
Note that the private key for the signature key (or the encryption key if
--sign-key is omitted) must be available to duplicity
when it runs. Duplicity also requires the passphrase for the signing key be
either entered manually or stored in an environment variable. If our encryption
key and signature key are the same, then a compromise of the server means a
compromise of the backed up data as well. We'll therefore use separate encryption
and signature keys.
Since the encryption key we're about to generate is going to be used to protect important data (passwords, email, documents) the private key should itself be well protected. Ideally, the keys should be stored on a secure drive that you keep on your person at all times, or failing that, a laptop that is well protected and not usually connected to a network.
First, we'll generate the signature key, owned by root, with the passphrase "signtest".
~# gpg --gen-key
gpg (GnuPG) 1.2.5; Copyright (C) 2004 Free Software Foundation, Inc.
This program comes with ABSOLUTELY NO WARRANTY.
This is free software, and you are welcome to redistribute it
under certain conditions. See the file COPYING for details.
Please select what kind of key you want:
   (1) DSA and ElGamal (default)
   (2) DSA (sign only)
   (4) RSA (sign only)
Your selection? 1
DSA keypair will have 1024 bits.
About to generate a new ELG-E keypair.
              minimum keysize is  768 bits
              default keysize is 1024 bits
    highest suggested keysize is 2048 bits
What keysize do you want? (1024) 1024
Requested keysize is 1024 bits
Please specify how long the key should be valid.
         0 = key does not expire
      <n>  = key expires in n days
      <n>w = key expires in n weeks
      <n>m = key expires in n months
      <n>y = key expires in n years
Key is valid for? (0) 1y
Key expires at Tue Mar  7 16:45:18 2006 PST
Is this correct (y/n)? y

You need a User-ID to identify your key; the software constructs the user id
from Real Name, Comment and Email Address in this form:
    "Heinrich Heine (Der Dichter) <heinrichh@duesseldorf.de>"
Real name: signtest
Email address: signtest@example.com
Comment: signtest
You selected this USER-ID:
    "signtest (signtest) <signtest@example.com>"
Change (N)ame, (C)omment, (E)mail or (O)kay/(Q)uit? O
You need a Passphrase to protect your secret key.
We need to generate a lot of random bytes. It is a good idea to perform
some other action (type on the keyboard, move the mouse, utilize the
disks) during the prime generation; this gives the random number
generator a better chance to gain enough entropy.
++++++++++++++++++++++++++++++.+++++++++++++++++++++++++++++++++++++++++++++++++
+.++++++++++..+++++.+++++.++++++++++.++++++++++++++++++++>++++++++++.......>..++
+++..+++++
+++++++++++++++++++++++++++++++++++.++++++++++.+++++.+++++++++++d+++++++++++++++
+++++++++++++++++++.+++++++++++++++.++++++++++++++++++++f.....>+++++.d....f.....
..>+++++.....+++++^^^
public and secret key created and signed.
key marked as ultimately trusted.
pub  1024D/B036117C 2005-03-08 signtest (signtest) <signtest@example.com>
     Key fingerprint = F278 70A7 656A 7692 4453  6F3D 7A5C 98A1 B036 117C
sub  1024g/5D2059A1 2005-03-08 [expires: 2006-03-08]
For convenience, we'll create a local user to own the encryption key. Do not do this for a production environment.
~#adduserEnter a username to add:backuptestAdding user `backuptest'... Adding new group `backuptest' (1001). Adding new user `backuptest' (1001) with group `backuptest'. Creating home directory `/home/backuptest'. Copying files from `/etc/skel' Enter new UNIX password: Retype new UNIX password: passwd: password updated successfully Changing the user information for backuptest Enter the new value, or press ENTER for the default Full Name []: Room Number []: Work Phone []: Home Phone []: Other []: Is the information correct? [y/N]y
Next, we'll generate the encryption key, owned by our backuptest user, with the passphrase "backuptest".
~#su - backuptestbackuptest@debian:~$gpg --gen-keygpg (GnuPG) 1.2.5; Copyright (C) 2004 Free Software Foundation, Inc. This program comes with ABSOLUTELY NO WARRANTY. This is free software, and you are welcome to redistribute it under certain conditions. See the file COPYING for details. gpg: /home/backuptest/.gnupg: directory created gpg: new configuration file `/home/backuptest/.gnupg/gpg.conf' created gpg: WARNING: options in `/home/backuptest/.gnupg/gpg.conf' are not yet active d uring this run gpg: keyring `/home/backuptest/.gnupg/secring.gpg' created gpg: keyring `/home/backuptest/.gnupg/pubring.gpg' created Please select what kind of key you want: (1) DSA and ElGamal (default) (2) DSA (sign only) (4) RSA (sign only) Your selection?1DSA keypair will have 1024 bits. About to generate a new ELG-E keypair. minimum keysize is 768 bits default keysize is 1024 bits highest suggested keysize is 2048 bits What keysize do you want? (1024)1024Requested keysize is 1024 bits Please specify how long the key should be valid. 0 = key does not expire <n> = key expires in n days <n>w = key expires in n weeks <n>m = key expires in n months <n>y = key expires in n years Key is valid for? (0)1yKey expires at Tue Mar 7 16:46:18 2006 PST Is this correct (y/n)?yYou need a User-ID to identify your key; the software constructs the user id from Real Name, Comment and Email Address in this form: "Heinrich Heine (Der Dichter) <heinrichh@duesseldorf.de>" Real name:backuptestEmail address:backuptest@example.comComment:backuptestYou selected this USER-ID: "backuptest (backuptest) <backuptest@example.com>" Change (N)ame, (C)omment, (E)mail or (O)kay/(Q)uit?OYou need a Passphrase to protect your secret key. We need to generate a lot of random bytes. It is a good idea to perform some other action (type on the keyboard, move the mouse, utilize the disks) during the prime generation; this gives the random number generator a better chance to gain enough entropy. +++++.+++++++++++++++++++++++++++++++++++++++++++++.+++++..++++++++++++++++++++. ++++++++++++++++++++.+++++.++++++++++++++++++++.++++++++++>+++++.+++++>+++++.... .................................................+++++ +++++++++++++++.+++++.+++++.+++++++++++++++++++++++++.....++++++++++...+++++++++ ++++++.+++++++++++++++.++++++++++++++++++++++++++++++.++++++++++>.+++++......... ......+++++^^^^^^^^^^^^^^^^^ gpg: /home/backuptest/.gnupg/trustdb.gpg: trustdb created public and secret key created and signed. key marked as ultimately trusted. pub 1024D/AFC6DCD1 2005-03-08 backuptest (backuptest) <backuptest@example.com> Key fingerprint = D025 7E7A 1BF2 5CA9 82DD EC54 2555 D7B6 AFC6 DCD1 sub 1024g/FEB03CBA 2005-03-08 [expires: 2006-03-08]
We'll export the public key for backuptest to a file:
backuptest:~$ gpg --armor --export backuptest > key.out
Alternatively, we could mail this key to a user on another domain:
backuptest:~$ gpg --armor --export backuptest | mail root@example.com
As root, we import the key sent to us by backuptest:
~# gpg --import /home/backuptest/key.out
gpg: key AFC6DCD1: public key "backuptest (backuptest) <backuptest@example.com>"
imported
gpg: Total number processed: 1
gpg:               imported: 1
And list our available keys:
~# gpg --list-keys
/root/.gnupg/pubring.gpg
------------------------
pub  1024D/B036117C 2005-03-08 signtest (signtest) <signtest@example.com>
sub  1024g/5D2059A1 2005-03-08 [expires: 2006-03-08]
pub  1024D/AFC6DCD1 2005-03-08 backuptest (backuptest) <backuptest@example.com>
sub  1024g/FEB03CBA 2005-03-08 [expires: 2006-03-08]
Finally, we must sign the key sent to us by backuptest (after checking the fingerprint, if backuptest is another human being):
~# gpg --sign-key backuptest
pub  1024D/AFC6DCD1  created: 2005-03-08 expires: 2006-03-08 trust: -/-
sub  1024g/FEB03CBA  created: 2005-03-08 expires: 2006-03-08
(1). backuptest (backuptest) <backuptest@example.com>
pub  1024D/AFC6DCD1  created: 2005-03-08 expires: 2006-03-08 trust: -/-
 Primary key fingerprint: D025 7E7A 1BF2 5CA9 82DD  EC54 2555 D7B6 AFC6 DCD1
     backuptest (backuptest) <backuptest@example.com>
This key is due to expire on 2006-03-08.
Do you want your signature to expire at the same time? (Y/n) y
How carefully have you verified the key you are about to sign actually belongs
to the person named above?  If you don't know what to answer, enter "0".
   (0) I will not answer. (default)
   (1) I have not checked at all.
   (2) I have done casual checking.
   (3) I have done very careful checking.
Your selection? (enter '?' for more information): 3
Are you really sure that you want to sign this key
with your key: "signtest (signtest) <signtest@example.com>" (B036117C)
I have checked this key very carefully.
Really sign? yes

You need a passphrase to unlock the secret key for
user: "signtest (signtest) <signtest@example.com>"
1024-bit DSA key, ID B036117C, created 2005-03-08
Our backup system needs a place on the network to which to backup. The configuration for the backup server will be covered more in part 2, but here is the minimal server configuration needed (which could be used by a lazy and trusting friend).
First create a user account for the backup client:
remote:~# adduser
Enter a username to add: abackupuser
Adding user `abackupuser'...
Adding new group `abackupuser' (1001).
Adding new user `abackupuser' (1001) with group `abackupuser'.
Creating home directory `/home/abackupuser'.
Copying files from `/etc/skel'
Enter new UNIX password:
Retype new UNIX password:
passwd: password updated successfully
Changing the user information for abackupuser
Enter the new value, or press ENTER for the default
        Full Name []:
        Room Number []:
        Work Phone []:
        Home Phone []:
        Other []:
Is the information correct? [y/N] y
Next, create a location for the backup files to live:
remote:~# su - abackupuser
abackupuser@remote:~$ mkdir backup
Now that our prerequisites are in place, we need a backup script.
Figure 2. The backup script
#!/bin/bash
export PASSPHRASE=signtest
duplicity --encrypt-key "AFC6DCD1" --sign-key "B036117C" \
--exclude /proc --exclude /mnt --exclude /tmp \
/ scp://abackupuser@remote/backup
The duplicity command in the script breaks down as follows:
- export PASSPHRASE=signtest
-
Set the PASSPHRASE environment variable to the passphrase for the signature key.
- --encrypt-key "AFC6DCD1"
-
Set the id of the encryption key to which backup archives should be encrypted.
- -sign-key "B036117C"
-
Set the id of the signature key with which backup archives should be signed.
- --exclude /proc --exclude /mnt --exclude /tmp
-
Don't backup the virtual /proc filesystem, any temporarily mounted drives, or temporary files.
- /
-
Backup starting at the root directory. Basically, back up everything. You could use the path of any directory you'd like to back up here.
- scp://abackupuser@remote/backup
-
The location to which backup files should be sent, as follows:
- scp
-
Specify that duplicity should use scp to transfer files.
- abackupuser
-
The username with which to connect to the remote system.
- remote
-
The remote system to which to send backup files.
- /backup
-
The relative path (from the user's home) to which to save backup files.
Note that the ids for --encrypt-key and --sign-key can be obtained from gpg --list-keys (see Generating Keys).
Also note that the user@host/relativepath format is
different than the normal scp format of user@host:/path.
Since this is the first time we've backed anything up, this will be a full backup; duplicity automatically detects this.
~# ./backup.sh
Password:
No signatures found, switching to full backup.
Password:
tmpkHY9NY                                                               100% 1509KB   1.5MB/s   00:00
Password:
tmpfcOHU-                                                               100%  528     0.5KB/s   00:00
Password:
tmpKSC17j                                                               100%   78KB  78.3KB/s   00:00
Password:
--------------[ Backup Statistics ]--------------
StartTime 1110490849.31 (Thu Mar 10 13:40:49 2005)
EndTime 1110490851.11 (Thu Mar 10 13:40:51 2005)
ElapsedTime 1.80 (1.80 seconds)
SourceFiles 90
SourceFileSize 3364455 (3.21 MB)
NewFiles 90
NewFileSize 3364455 (3.21 MB)
DeletedFiles 0
ChangedFiles 0
ChangedFileSize 0 (0 bytes)
ChangedDeltaSize 0 (0 bytes)
DeltaEntries 90
RawDeltaSize 3360224 (3.20 MB)
TotalDestinationSizeChange 1546182 (1.47 MB)
Errors 0
-------------------------------------------------
This is backing up a very small directory, for example purposes. The user is prompted for the password for abackuptest@remote five separate times! This is unacceptable for an unattended backup, so we'll have to resolve this later.
We can see the files generated on remote:
abackupuser@remote:~/backup$ ls -1
duplicity-full-signatures.2005-03-10T13:40:45-07:00.sigtar.gpg
duplicity-full.2005-03-10T13:40:45-07:00.manifest.gpg
duplicity-full.2005-03-10T13:40:45-07:00.vol1.difftar.gpg
So, we've got a working remote backup, but we'll have to fix it so that the user doesn't have to enter a password each time to upload a file.
To make our backup work unattended (i.e. via cron), we'll need to set up a method to automatically log in to our remote host. The standard method to do this is to use ssh keys. There is an excellent discussion of key management on the IBM website.
For now, we'll create a key normal with a passphrase. This kind of setup will still require us to enter a passphrase (for the key, not the ssh connection), but it'll simplify our next steps towards an unattended backup.
As root on our backup client, run ssh-keygen to create our ssh key:
~# ssh-keygen -t dsa
Generating public/private dsa key pair.
Enter file in which to save the key (/root/.ssh/id_dsa):
Enter passphrase (empty for no passphrase):
Enter same passphrase again:
Your identification has been saved in /root/.ssh/id_dsa.
Your public key has been saved in /root/.ssh/id_dsa.pub.
The key fingerprint is:
65:73:77:bd:83:5c:4a:6c:17:88:e0:43:1b:0c:ab:d4 root@local
Your key fingerprint will be different.
Next we need to send our public key to our backup server:
~# scp ~/.ssh/id_dsa.pub abackupuser@remote:/home/abackupuser
On remote we add this key to the authorized keys of abackupuser:
abackupuser@remote:~$ cat id_dsa.pub >> ~/.ssh/authorized_keys
Now if we try to log in as abackupuser@remote, we get a prompt for our passphrase instead of for our password:
~# ssh abackupuser@192.168.0.17
Enter passphrase for key '/root/.ssh/id_dsa':
This is fine, but we still have a passphrase that will have to be entered at backup time.
In order to script our backups while using a ssh key with a passphrase, we need an application which will retain use of the key over a long term. We'll use keychain, a tool which itself uses ssh-agent, which does the actual caching.
Install keychain:
~# apt-get install keychain
To set up local root's bash profile to run keychain on login, add these lines to ~/.bash_profile:
keychain --clear id_dsa
. ~/.keychain/$HOSTNAME-sh
This will have keychain first clear the existing keys (in the case of a normal root compromise, the attacker can't access the remote systems), then attempt to load the id_dsa key and finally source the appropriate output from ssh-agent.
The next time root logs in, she will be prompted to enter the passphrase for the ssh key, and any subsequent process running as root will not need to use a password to log into remote, as when backup.sh is run:
user@local:~$su -Password: KeyChain 2.5.1; http://www.gentoo.org/proj/en/keychain/ Copyright 2002-2004 Gentoo Foundation; Distributed under the GPL * Found existing ssh-agent (11726) * ssh-agent: All identities removed. * Adding 1 ssh key(s)... Enter passphrase for /root/.ssh/id_dsa: Identity added: /root/.ssh/id_dsa (/root/.ssh/id_dsa) ~#./backup.shNo signatures found, switching to full backup. tmpyGNA5U 100% 5110KB 2.5MB/s 00:02 tmp5MPT6X 100% 5123KB 1.3MB/s 00:04 tmpQli3JE 100% 5121KB 5.0MB/s 00:01 tmp2T9fis 100% 5120KB 5.0MB/s 00:01 tmpiYM1J7 100% 5126KB 2.5MB/s 00:02 tmpMiQ4Lh 100% 1330KB 1.3MB/s 00:00 tmpGsz2q4 100% 879 0.9KB/s 00:00 tmp_VvUet 100% 129KB 129.5KB/s 00:00 --------------[ Backup Statistics ]-------------- StartTime 1116749899.09 (Sun May 22 01:18:19 2005) EndTime 1116749925.78 (Sun May 22 01:18:45 2005) ElapsedTime 26.68 (26.68 seconds) SourceFiles 6 SourceFileSize 27933523 (26.6 MB) NewFiles 6 NewFileSize 27933523 (26.6 MB) DeletedFiles 0 ChangedFiles 0 ChangedFileSize 0 (0 bytes) ChangedDeltaSize 0 (0 bytes) DeltaEntries 6 RawDeltaSize 10670280 (10.2 MB) TotalDestinationSizeChange 27576857 (26.3 MB) Errors 0 -------------------------------------------------
The backup script would now be able to be run from cron since there is no requirement for passwords to be entered during the backup process.
Please note that using keychain is not a silver bullet to prevent an attacker from using your ssh keys. It may be possible for a determined attacker to compromise keys from system memory; security thus must also be added on the backup server side to prevent tampering, especially to the authorized_keys file.
The first thing to do after running a backup is of course to verify that it worked and for that we need a verify script.
Figure 3. The verify script
#!/bin/bash
export PASSPHRASE=signtest
duplicity --encrypt-key "AFC6DCD1" --sign-key "B036117C" \
--verbosity 4 --verify \
--exclude /proc --exclude /mnt --exclude /tmp \
scp://abackupuser@remote/backup /
The verify script is very similar to the backup script, but we've reversed the
order of the source and the destination (the / and scp:// sections), and added two
options:
- --verbosity 4
-
When verbosity for duplicity is 4 or higher, we'll see a message for each file that's changed since the backup.
- --verify
-
Verifies the backup rather than restoring or backing up.
If this verification script is run immediately after a full backup, very few files will have changed, perhaps only a few log files.
~# ./verify.sh
Error initializing file /dev/log
Error initializing file /dev/printer
Difference found: File dev/ptmx has mtime Sat Mar  5 20:09:11 2005, expected Sat Mar  5 19:40:43 2005
Difference found: File dev/pts/0 has mtime Sat Mar  5 20:09:18 2005, expected Sat Mar  5 19:41:01 2005
Difference found: File var/log/auth.log has mtime Sat Mar  5 20:09:01 2005, expected Sat Mar  5 19:39:01 2005
Difference found: File var/log/exim/mainlog has mtime Sat Mar  5 20:08:01 2005, expected Sat Mar  5 19:38:01 2005
Difference found: File var/log/messages has mtime Sat Mar  5 20:10:58 2005, expected Sat Mar  5 19:39:52 2005
Difference found: File var/log/syslog has mtime Sat Mar  5 20:09:01 2005, expected Sat Mar  5 19:39:52 2005
Verify complete: 31097 files compared, 6 differences found.
Restoring traditional incremental backups can be painful if one has to apply each incremental backup by hand. Duplicity automatically applies the incrementals to the full backup without any extra intervention.
If we are on a system and we have a disk we would like to restore to mounted
on /mnt, a restore script for a full backup
might look like this:
Figure 4. The restore script
#!/bin/bash
export PASSPHRASE=signtest
duplicity --encrypt-key "AFC6DCD1" --sign-key "B036117C" \
scp://abackupuser@remote/backup /mnt/restore
cd /mnt
mv restore/* .
rmdir restore
mkdir mnt
mkdir proc
mkdir tmp
Duplicity will not allow restoration to an existing directory (e.g. /mnt), so pointing it to /mnt/restore makes us do a little extra work in
moving the restored data around, but it's relatively simple. We also must
recreate our excluded system directories.
Next, we run the restore script, which gives no feedback at the default verbosity.
~# mount /dev/hdc1 /mnt
~# ./restore.sh
We can check to see what the restore produced:
~# ls -al /mnt/restore
total 92
drwxr-xr-x  18 root root   4096 Mar  5 20:24 .
drwxr-xr-x   3 root root   4096 Mar  5 20:15 ..
drwxr-xr-x   2 root root   4096 Feb 20 07:42 bin
drwxr-xr-x   3 root root   4096 Feb 20 07:46 boot
drwxr-xr-x   2 root root   4096 Jan 17 07:30 cdrom
drwxr-xr-x  11 root root  24576 Mar  5 05:50 dev
drwxr-xr-x  48 root root   4096 Mar  5 19:39 etc
drwxr-xr-x   2 root root   4096 Jan 17 07:30 floppy
drwxrwsr-x   3 root staff  4096 Jan 17 07:41 home
drwxr-xr-x   2 root root   4096 Jan 17 07:30 initrd
lrwxrwxrwx   1 root root     28 Mar  5 20:16 initrd.img -> boot/initrd.img-2.4.27-1-386
lrwxrwxrwx   1 root root     27 Mar  5 20:16 initrd.img.old -> /boot/initrd.img-2.4.18-386
drwxr-xr-x   8 root root   4096 Feb 20 07:42 lib
drwx------   2 root root   4096 Jan 17 07:25 lost+found
drwxr-xr-x   2 root root   4096 Jan 17 07:30 opt
drwxr-xr-x   3 root root   4096 Jan 17 15:10 root
drwxr-xr-x   2 root root   4096 Feb 20 07:42 sbin
drwxr-xr-x   2 root root   4096 Dec 26 18:40 sys
drwxr-xr-x  11 root root   4096 Jan 17 09:25 usr
drwxr-xr-x  14 root root   4096 Feb 20 17:48 var
lrwxrwxrwx   1 root root     25 Mar  5 20:19 vmlinuz -> boot/vmlinuz-2.4.27-1-386
lrwxrwxrwx   1 root root     23 Mar  5 20:19 vmlinuz.old -> boot/vmlinuz-2.4.18-386
As a final step to a restore, we also have to make the system bootable. Assuming we're using grub, and assuming we've restored to hdc1:
~# /sbin/grub-install /dev/hdc1
Next, test our new system.
~# shutdown -h now
Once the machine is off, switch out hda for hdc (put the disk we've just restored onto ide0), and turn the power back on. If all went well, you should have a fully working system from your backup.
This is a quick summary for the forgetful or the impatient.
-
"client" is the backup client, i.e. the computer whose data we are backing up.
-
"server" is the backup server, i.e. the computer to which we are backing up.
-
"laptop" is the client administrator's secured location for their GPG keys.
-
on client, install duplicity:
apt-get install duplicity -
on client, generate signature key:
gpg --gen-key -
on laptop, generate encryption key:
gpg --gen-key -
on laptop, send public encryption key to root on client
-
on client, import encryption key:
gpg --import-key backuptest.asc -
on client, sign encryption public key:
gpg --sign-key backuptest -
on client, generate ssh key:
ssh-keygen -t dsa -
on client, send public ssh key to backup user on server (or to server administrator)
-
on server, add ssh key to authorized_keys:
cat id_dsa.pub >> ~/.ssh/authorized_keys -
on client, install keychain:
apt-get install keychain -
on client, add to
.bash_profile:keychain --clear id_dsa . ~/.keychain/$HOSTNAME-sh -
on client, set up cron to regularly run the backup script:
crontab -eand add:0 22 * * * /root/backup.sh
We've created a nice system for clients; unattended backups that occur over the network, provide incremental granularity with only differential changes sent, and are encrypted to prevent against snooping.
There are still some areas of concern, specifically that if a client machine is compromised an attacker could gain access to the backup server and destroy existing backups, or that another backup server user might destroy existing backups. The defenses against these potential problems are server-side, so we'll take a look at these next time.